How to Save Heirloom Seeds for Next Year
Table of Contents
- Why Save Heirloom Seeds at All?
- When to Harvest Seeds from Vegetables
- Wet vs. Dry Processing: Two Paths to Clean Seeds
- How to Test Seed Viability Before You Store
- Best Containers for Seed Storage and Drying
- Storing Seeds for Humid Climates and Small Spaces
- Keeping Varieties True-to-Type: Cross-Pollination Basics
- Your Seed-Saving Toolkit from Firefly Farm
- Frequently Asked Questions
Last Updated: September 9, 2026
Saving seed from your own garden is one of the most rewarding habits a gardener can build, yet many never try it because the process feels technical or risky. The truth is that learning how to save heirloom seeds for next year is straightforward once you understand a few basic rules about timing, processing, and storage. At Firefly Farm and Mercantile, we talk with gardeners every season who are surprised by how simple it is to preserve their favorite varieties, and this guide walks through the entire process step by step.
The core idea is that an heirloom seed is a living story. When you save seeds from an open-pollinated variety like Brandywine Pink Tomato or Amish Paste Tomato, you are continuing a lineage that may stretch back over a century. Unlike hybrids, heirlooms breed true-to-type, meaning the seeds you save will produce plants nearly identical to the parent. That genetic continuity is why seed saving matters for biodiversity and why groups like Slow Food USA's Ark of Taste program catalog endangered heirloom varieties worth preserving.

Below, we will cover exactly when to harvest, the two processing methods, how to test whether your seeds are viable, and the best containers for seed storage. You will also learn how to keep varieties pure through simple isolation practices, plus specific strategies for humid climates and small-space gardeners.
Why Save Heirloom Seeds at All?
Saving seeds is an act of self-reliance and conservation rolled into one. When you save heirloom seeds, you stop depending on annual seed catalogs and start building a personal seed bank adapted to your own microclimate. Over generations, gardeners have selected plants that perform well in their specific soil and weather, a process that simply cannot be replicated by buying fresh seed each year.
There is also the matter of flavor and history. Heirloom tomatoes like Brandywine Pink, introduced in the 1880s, are often described as the benchmark for taste among beefsteak varieties. A University extension guide on heirloom vegetables notes that heirloom varieties are treasured for traits like flavor, color, and texture that were sometimes sacrificed in modern commercial breeding. When you save those seeds, you become part of that preservation effort.

Finally, seed saving saves money. A single $3.50 packet of Amish Paste Tomato seed can produce hundreds of fruits, each holding dozens of seeds. One season of saving from your best plants gives you enough seed for years of future gardens, and plenty to share with fellow gardeners in your community.
When to Harvest Seeds from Vegetables
Timing is everything when you want to save heirloom seeds successfully. The golden rule is that seeds must be fully mature before harvest, which often means leaving the fruit or pod on the plant longer than you would for eating. For most vegetables, seed maturity happens after eating maturity, sometimes by several weeks.
A common mistake is harvesting seeds from fruit that looks perfect for the table. Tomato seeds, for example, are only ready when the fruit is fully ripe or even slightly overripe, ideally still firm but deeply colored. Bean and pea pods should be left on the vine until they rattle and the seeds inside are hard. Lettuce and other leafy crops bolt to flower, then form seed heads that need to dry completely before collection.
For root crops like the Purple Top White Globe Turnip, you are actually saving from the second year of growth. These biennials need a full season to form a root, then a cold period, then a second season to flower and set seed. Plan for this longer timeline if you want to save turnip, carrot, or beet seed. Harvest seed heads on a dry afternoon, and if rain threatens, pull entire plants and let them finish drying indoors in a paper bag.
Wet vs. Dry Processing: Two Paths to Clean Seeds
Seed processing splits into two methods based on how the seed is held inside the fruit. Dry processing suits seeds that develop in pods or seed heads, like beans, lettuce, turnips, and most flowers. Wet processing is required for seeds embedded in fleshy fruit, where the seed is wrapped in a gel coating or pulp that must be removed before storage.
Dry processing is the simpler path. Once pods or seed heads are thoroughly dry, crush them by hand or with a rolling pin, then winnow away the chaff. A seed cleaning screen helps separate seed from debris quickly. Work outdoors on a breezy day, pouring the crushed material between two bowls so the lighter chaff blows away while heavier seeds drop straight down.
Wet processing takes more patience but is not difficult. Seeds from tomatoes, cucumbers, squash, and melons all carry pulp that can harbor bacteria and inhibit germination if left to dry on the seed. The fermentation method described below is the most reliable way to clean these seeds, and it has the bonus of helping to prevent seed-borne diseases.
Fermenting Tomato Seeds the Easy Way
Fermentation mimics the natural process that happens when a tomato falls to the ground and rots. Squeeze the seeds and pulp from fully ripe tomatoes into a glass jar, add about an equal volume of water, and set the jar in a warm spot out of direct sun. Within two to four days, a layer of mold will form on top, which is a good sign.
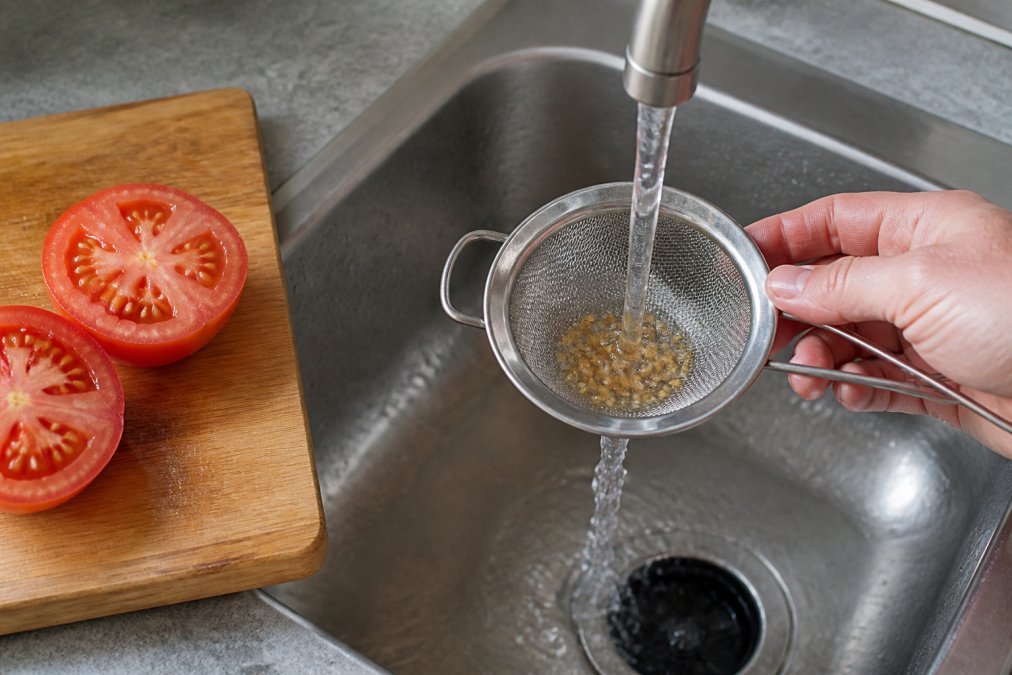
That mold breaks down the gel coating around each seed and releases natural antibiotics that protect the seeds from disease. When the seeds sink to the bottom and the liquid clears, pour off the mold and pulp, rinse the seeds in a fine mesh strainer, and spread them on a coffee filter or glass dish to dry. Stir them daily for about a week until they snap rather than bend. This method works beautifully for Amish Paste Tomato and other paste varieties that hold a lot of pulp.
How to Test Seed Viability Before You Store
Testing your saved seed before investing a season in it prevents disappointment, and the process takes only a few days. The simplest method is the paper towel test. Count out ten seeds, place them on a damp paper towel, fold it over, and tuck it into a labeled plastic bag in a warm spot. Check every couple of days and count how many sprout.
A germination rate of 70 percent or higher means the seed is worth keeping for normal planting (extension.org). Below that, either sow more thickly to compensate or use the seed for sprouts. This quick check is especially valuable for older seed that may have lost vigor, and it costs nothing beyond a paper towel and a few days of waiting.
For gardeners who save many varieties, keeping a simple notebook with germination dates and rates helps track which seed lots perform best in your conditions. Record the variety, the year saved, and the test date. Over time, this record becomes a personal reference that tells you exactly which of your saved seeds you can trust for the coming season.
Best Containers for Seed Storage and Drying
The best containers for seed storage keep moisture out while allowing seeds to breathe during the initial drying phase. Paper envelopes work fine for short-term storage of fully dry seed, but for anything lasting more than a season, switch to airtight containers. Glass mason jars with tight lids are a favorite because they are reusable, transparent, and truly seal out humidity.
Before sealing seeds away, they must be completely dry. Seeds that still contain moisture will sweat inside an airtight jar, inviting mold and ruining the entire batch. A reliable test is the snap test: a dry seed breaks cleanly when bent, while a moist one bends without snapping. If you have any doubt, leave seeds on a screen or coffee filter for another week.
For extra protection in humid conditions, add a desiccant packet or a spoonful of dry rice wrapped in a tissue to the bottom of each jar. Silica gel packets work even better. Label every container with the variety and the year saved, because unlabeled seed loses its value the moment you cannot remember what it is or when it was collected.
Container | Best For | Keep or Skip |
|---|---|---|
Paper envelopes | Short-term storage, seed swapping | Keep for 1 season |
Glass mason jars | Long-term storage, airtight seal | Best overall choice |
Plastic zip bags | Temporary storage during processing | Skip for long-term |
Metal tins | Dark, rodent-proof storage | Keep if lined with paper |
Storing Seeds for Humid Climates and Small Spaces
Humidity is the single biggest enemy of stored seed, and gardeners in damp climates must take extra precautions. The ideal storage environment is cool, dark, and dry, with temperatures ideally below 60°F and relative humidity under 50 percent. A refrigerator shelf in a sealed jar works well for many gardeners, provided seeds are completely dry before going in.
The trick with refrigerator storage is guarding against condensation. Never open a cold jar of seeds in a warm room, because moisture will condense on the seeds. Let jars warm to room temperature before opening, and return them to the fridge promptly. Some gardeners add a desiccant packet to each jar as a second line of defense against any residual moisture.
Small-space and container gardeners face a different challenge: not volume but variety. When every square foot counts, choose compact heirlooms that produce abundant seed without sprawling. Tom Thumb Bibb Lettuce, a pre-1850 butterhead that forms heads the size of tennis balls, is perfect for a patio pot and yields plenty of seed from just a few plants. Saving seed from a handful of well-chosen varieties fits easily on one shelf, making seed saving accessible even on a balcony.

Keeping Varieties True-to-Type: Cross-Pollination Basics
Saving heirloom seeds only preserves the variety if those seeds are pure, which means preventing cross-pollination between different varieties of the same species. The key concept is isolation distance, the minimum separation needed to keep pollen from traveling between compatible plants. For self-pollinating crops like tomatoes, lettuce, and beans, a short distance of 10 to 25 feet between varieties is usually enough.
Cross-pollinating crops are another story. Squash, cucumbers, and corn readily exchange pollen over surprising distances, and different varieties planted close together will produce hybrid seed that does not come true next year. To keep varieties pure, either grow only one variety of a cross-pollinating crop each season, or separate varieties by the recommended isolation distances, which can range from several hundred feet to a full mile for corn.
A practical workaround for small gardens is hand pollination. For squash, identify a female flower that will open tomorrow, tape it shut the evening before, then the next morning transfer pollen from a male flower of the desired variety and tape the female shut again. This guarantees pure seed even in a tiny urban plot. Flowering crops like the heirloom varieties Firefly Farm and Mercantile carries benefit from the same attention if you want to save their seed.
Your Seed-Saving Toolkit from Firefly Farm
Building a seed-saving practice starts with choosing varieties worth preserving, and that is exactly where Firefly Farm and Mercantile comes in. Our collection focuses on rare heirlooms and open-pollinated varieties with documented histories, from the Slow Food Ark of Taste listed Amish Paste Tomato to the legendary 1880s Brandywine Pink Tomato. Each packet carries the story of the variety, so you know what you are preserving and why it matters.
For gardeners starting their seed-saving journey, we recommend beginning with self-pollinating crops that are forgiving of small isolation distances. The compact Tom Thumb Bibb Lettuce is ideal for containers and first-time seed savers, while the hardy Purple Top White Globe Turnip offers a satisfying biennial project for those ready to plan across two seasons. Every seed we offer is sourced ethically and selected for gardeners in cold climates with shorter harvest windows.
What sets us apart is the personal guidance behind every order. Owner Andre personally ensures each customer understands what they are receiving, a level of care reflected in our 4.8-star rating across 500-plus reviews. Whether you are preserving a family heirloom or starting a new tradition, we are here to help you choose varieties that will thrive in your garden and produce seed worth saving for generations.
Saving heirloom seeds turns a single season of gardening into an ongoing conversation with the past. The process asks for patience at harvest, care in cleaning, and discipline in storage, but the reward is a personal seed bank shaped by your own hands and your own soil. Firefly Farm and Mercantile offers the rare, open-pollinated varieties worth that effort, backed by the kind of personal advice that makes the difference between a packet of seed and a living legacy. Explore our heirloom collection and start saving seed that carries your garden's story forward.
Frequently Asked Questions
Can I save seeds from heirloom varieties?
Yes, that is the whole point of heirlooms. Unlike hybrids, heirloom varieties are open-pollinated, which means the seeds will produce plants that match the parent, staying true-to-type year after year. Look for the open-pollinated label on seed packets. Saving seeds from hybrid plants gives unpredictable results, so stick with heirlooms for dependable harvests that carry forward the history and flavor you love.
How many years will heirloom seeds last?
With proper storage in a cool, dark, dry place, most heirloom seeds stay viable for 3 to 5 years. Some, like tomatoes and lettuce, can last longer. The key is keeping moisture content low and temperature steady. Airtight containers with a desiccant packet help. Always label with the year saved, and run a germination test before planting if seeds are older than two years.
Do I need to ferment tomato seeds before saving them?
Fermentation is recommended for tomato seeds. It removes the gel coating that inhibits germination and helps prevent seed-borne diseases. Simply squeeze seeds and pulp into a jar, add a little water, and let it sit for 3 to 5 days until mold forms on top. Rinse the good seeds, which sink, and dry them thoroughly on a coffee filter or screen before storing.
What is the best way to dry seeds before storage?
Spread seeds in a single layer on a coffee filter, paper plate, or fine screen in a warm, dry, well-ventilated area out of direct sun. Stir them daily so they dry evenly. Seeds are ready when they snap rather than bend. Drying thoroughly is the single most important step for long-term viability, as excess moisture leads to mold and rot in storage.


