How to Store Dahlia Bulbs for Winter: A Complete Guide
Table of Contents
- When to Dig Up Dahlia Tubers Before the First Frost
- How to Lift, Clean, and Cure Dahlia Tubers
- How to Divide Dahlia Tubers Before or After Storage
- Choosing the Right Dahlia Tuber Storage Medium
- How to Store Dahlia Bulbs: Containers, Location, and Conditions
- Troubleshooting Stored Dahlia Bulbs: Rot, Shriveling, and More
- Waking Up Stored Dahlia Tubers for Spring Planting
- Conclusion
Last Updated: August 28, 2026
Dahlia tubers are survivors by nature, but they have one critical weakness: a hard freeze will kill them. Knowing how to store dahlia bulbs through winter is the difference between digging up a thriving root clump next spring and finding nothing but mush. This guide covers every step, including the troubleshooting scenarios most articles skip entirely.
The good news: winter storage is straightforward once you understand what dahlias need during dormancy. They want cool, dark, and slightly moist conditions, not bone dry, not wet, not warm. Below, we'll walk through the complete process from lifting to spring re-awakening, including climate-specific variations and sustainable storage alternatives.
When to Dig Up Dahlia Tubers Before the First Frost
Timing is critical. Dig too early and you sacrifice weeks of tuber development. Wait too long and that means your tubers will freeze. Lift dahlia tubers a few weeks after the first light frost blackens the foliage, but before the soil freezes. For us this can be 4-6 weeks after the first hard frost.
Reading Your Growing Zone
Growing zone determines your urgency. Gardeners in USDA Hardiness Zones 3-6 need to act fast; the gap between first frost and ground freeze is just a few weeks. Zones 7-8 have more flexibility, and in Zones 9-10, dahlias can sometimes overwinter in the ground with heavy mulching, though lifting and storing still produces more reliable results.
According to USDA Plant Hardiness Zone Map, first frost dates vary dramatically across regions, so check your specific zone rather than relying on a neighbor's experience.
Signs the Foliage Is Ready
Frost-blackened foliage is your clearest signal. The stems will turn dark and collapse. Wait an additional week after blackening to allow the plant to push remaining energy into the tuber. Before you dig, look for stems that are hollow and papery at the base and foliage that's fully brown rather than just frost-nipped at the tips.
Don't wait for the soil to freeze. Once the ground hardens, you risk snapping tubers during lifting. It is important to get your tubers out of the ground before the ground freezes, as it will freeze your tubers and they will die.
How to Lift, Clean, and Cure Dahlia Tubers
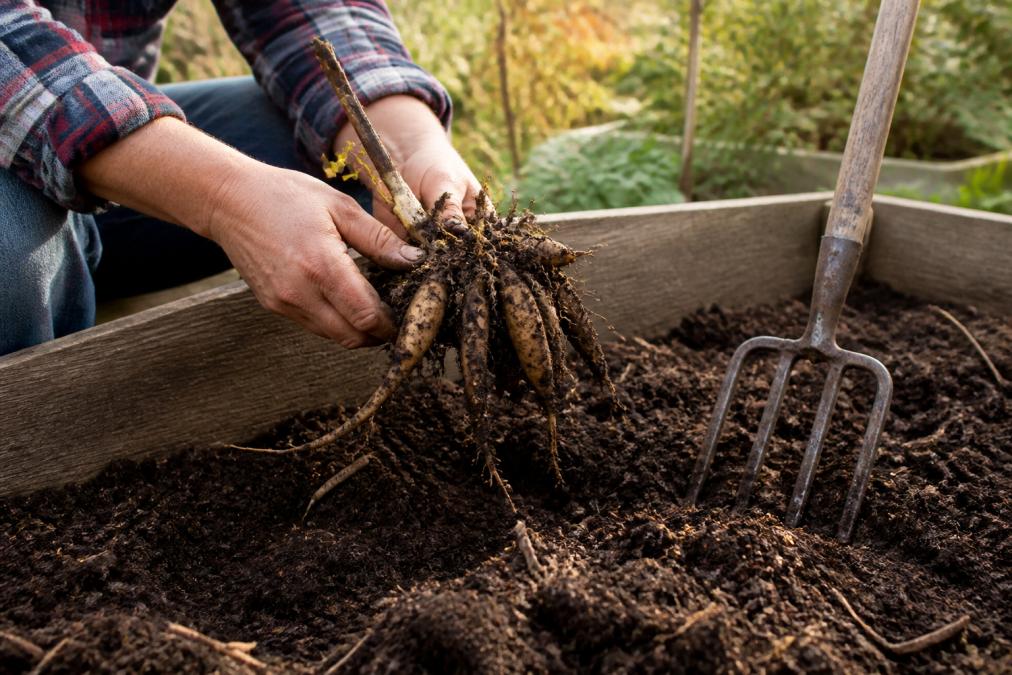
Lifting dahlias correctly prevents most rot and desiccation problems. The biggest mistake is using a spade and cutting straight down, you'll slice through tubers you can't see.
Use a garden fork instead. Insert it at least 12 inches from the base of the plant and work in a wide circle, loosening the soil before lifting. Then reach under the root clump with both hands and pull upward gently.
Cleaning the Root Clump
Shake off loose soil first. Then rinse the clump with a hose, paying attention to the neck of each tuber, that's where rot typically starts. Remove any obviously damaged or broken tubers now rather than letting them contaminate healthy ones in storage.
Trim the stems back to about 2-4 inches above the crown.
Curing for Long-Term Storage
After cleaning, let your tubers air-dry in a frost-free location for 24-48 hours. A garage, covered porch, or basement floor works well. The goal is to let cut surfaces callous over slightly, creating a barrier against fungal growth during storage. Never place dahlia tubers are concreate floors as that will suck the moisture right out of them.
Some growers dust cured tubers lightly with sulfur powder or cinnamon before packing; both have antifungal properties and neither introduces synthetic chemicals.
How to Divide Dahlia Tubers Before or After Storage
Dividing dahlia tubers is how you turn one plant into many, and the timing is genuinely debated among experienced growers.
Dividing before storage gives you smaller, easier-to-store pieces and lets you immediately discard any tuber with a damaged neck or no visible eye. The downside: eyes are often invisible in fall.
Dividing after storage, in late winter or early spring, solves the eye problem. By March, eye development is usually visible as small pink or red buds on the crown, so you can divide with confidence.
For most gardeners: store the whole clump if space allows, then divide in late winter when eyes are visible. If storage space is tight, do a rough fall division and plan to discard any tubers that don't show eyes by spring.
Each division needs at least one eye and an intact neck connecting it to a piece of the crown. A tuber with no neck attachment will not grow.
Choosing the Right Dahlia Tuber Storage Medium
The storage medium prevents desiccation by maintaining just enough ambient humidity while allowing enough air circulation to prevent fungal growth.
Storage Medium | Moisture Retention | Air Circulation | Best For |
|---|---|---|---|
Vermiculite | Moderate | Good | Most climates |
Peat moss | High | Moderate | Dry climates, prone to shriveling |
Cedar shavings | Low | Excellent | Humid climates, rot-prone |
Coconut coir | Moderate | Good | Sustainable alternative to peat |
Dry sand | Low-Moderate | Good | Larger tubers, cool basements |
Paper bags (unlined) | Very low | Excellent | Mild winters, Zone 7-8 |
Vermiculite is the most widely recommended medium because it's consistent and widely available. Coconut coir is a functionally similar, more sustainable option. Cedar shavings are underused and genuinely effective, particularly in humid climates where fungal growth is the bigger threat.
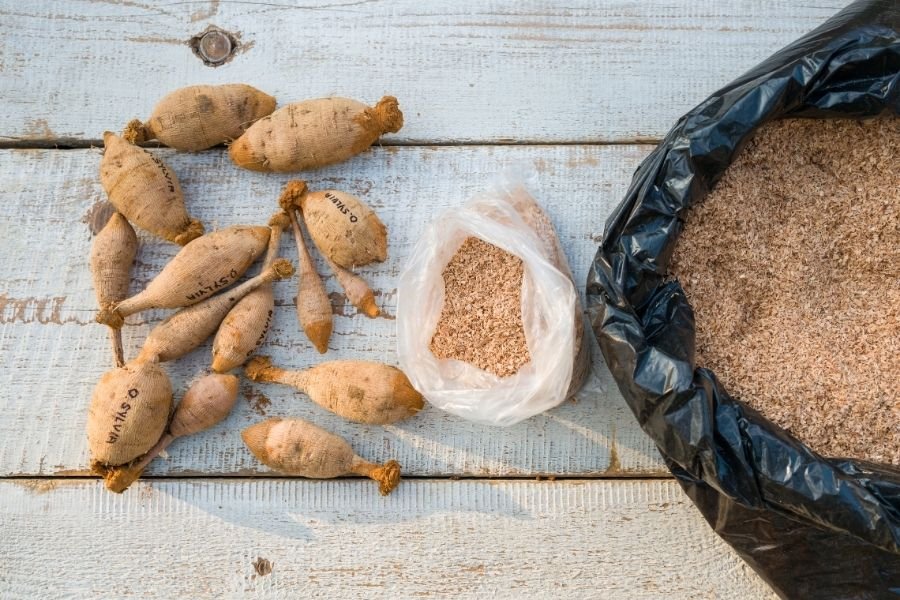
Pack tubers in a single layer if possible, or in alternating layers with medium between each tuber so they're not touching. Contact between tubers spreads rot rapidly.
How to Store Dahlia Bulbs: Containers, Location, and Conditions
The ideal storage conditions are a temperature between 40°F and 50°F (4°C-10°C) with humidity levels around 50-60%. Warmer than 50°F and tubers may break dormancy prematurely or rot. Colder than 40°F and you risk freeze damage.
For containers, cardboard boxes breathe and help with moisture control but offer no protection against pests. Plastic bins seal out mice and insects but trap humidity; if you use plastic, leave the lid slightly ajar or drill ventilation holes. We prefer plastic totes with various mediums inside.
Frost-Free Locations That Actually Work
An unheated basement that holds 45°F through winter is ideal. A finished basement that stays at 65°F is too warm.
Other locations that reliably work:
- Unheated attached garage: Works in most of the country if temperatures stay above freezing.
- Root cellar or crawl space: Often the most stable environment.
- Unheated garden shed: Viable in Zones 6-8 if you insulate the container.
- Refrigerator (crisper drawer): Excellent for small quantities at 40-45°F in a paper bag with slightly damp medium.
What doesn't work: heated garages, attics, or any space that regularly drops below 32°F without insulation.
Climate-Specific Storage Variations
Cold climates (Zones 3-5): Insulate storage containers with old blankets or newspapers if storing in an unheated space. Check monthly and move containers if temperatures drop unexpectedly.
Humid climates (Gulf Coast, Pacific Northwest): Rot is your primary enemy. Use cedar shavings or dry sand over vermiculite. Check every three to four weeks.
Dry climates (Mountain West, high desert): Desiccation is the bigger threat. Peat moss or slightly moistened coconut coir helps maintain humidity.
According to University of Minnesota Extension's dahlia overwintering guidance, checking stored tubers periodically and adjusting conditions when problems appear is more effective than any single "set it and forget it" approach.
Troubleshooting Stored Dahlia Bulbs: Rot, Shriveling, and More
Soft, mushy tubers with a foul smell: Classic rot, usually caused by excess moisture. Remove affected tubers immediately; rot spreads fast. If rot is isolated to one end, cut it back to clean tissue, dust with sulfur or cinnamon, and let it callous for 24 hours before returning to storage.
Shriveled, wrinkled tubers: Desiccation. The storage environment is too dry. Lightly mist the storage medium, or add a small piece of barely damp sphagnum moss to the container. Moderately shriveled tubers can often recover; severely shriveled ones rarely do.
White or gray fuzzy growth: Fungal growth, often botrytis. Remove affected tubers, improve ventilation, and reduce humidity. Lightly dust remaining tubers with sulfur.
Tubers that feel firm but look very dark: Not necessarily a problem. Some varieties naturally darken in storage. Press the tuber firmly; if it has any give or soft spots, investigate further.
Mice damage: Rodents love dahlia tubers. Store in a plastic bin with ventilation holes or a metal trash can. Cedar shavings also deter rodents somewhat.
As noted in Oregon State University Extension's guide to dahlia storage, tuber health at lifting time is the strongest predictor of storage success.
Waking Up Stored Dahlia Tubers for Spring Planting
About four to six weeks before your last expected frost date, bring your stored tubers into a warmer environment around 60°F. Within one to two weeks, eyes should begin to swell and show color on the crown.
This is the right moment to divide if you stored whole clumps. Eyes are now visible, and you have time to pot divisions up before outdoor planting.
Starting tubers indoors: Pot divided tubers in lightweight mix about three to four weeks before transplanting outdoors. Keep them in a bright location at 60-65°F. Don't overwater; the tuber itself holds enough moisture to push initial growth.
What healthy tubers look like at this stage: Firm, plump, with visible eyes beginning to swell. The skin may be slightly wrinkled, but the interior should be solid.
What to discard: Any tuber that is soft, hollow, has no visible eye after several weeks of warmth, or shows active rot.
Dahlias that look slow to start in early spring often catch up quickly once soil temperatures warm outdoors. Resist planting too early; dahlia tubers in cold, wet soil are more vulnerable than tubers still in storage.
Many gardeners note that understanding this full seasonal cycle transforms their results. For additional guidance on dahlia culture, the American Dahlia Society's cultural notes offer detailed variety-specific information that complements the storage practices covered here.
Step | Timing | Key Action | Watch For |
|---|---|---|---|
Lift tubers | After first frost blackens foliage | Use garden fork, lift whole clump | Snapped necks, cut tubers |
Clean and cure | Same day as lifting | Rinse, trim stems, air-dry 24-48 hrs | Excess moisture on tuber surface |
Divide (optional) | Fall or late winter | Cut with clean knife, keep eyes intact | Tubers with no eye or neck |
Pack for storage | After curing | Layer in medium, no contact between tubers | Tubers touching each other |
Store | November through March | 40-50°F, 50-60% humidity, frost-free | Temperature swings, rodents |
Check monthly | Every 3-4 weeks | Inspect for rot, shriveling, fungal growth | Soft spots, white fuzz, wrinkling |
Wake up | 4-6 weeks before last frost | Move to 60°F, watch for eyes to swell | No eye development after 2 weeks |
Divide and pot | When eyes are visible | Pot in lightweight mix, bright location | Overwatering before outdoor planting |
Storing dahlia tubers through winter rewards attention to detail. Firefly Farm and Mercantile carries a curated selection of dahlia tubers, including heirloom and untreated varieties. Shop our seasonal bulb collection and grow dahlias that come back stronger every year.
Frequently Asked Questions
Q: Can you store dahlia tubers in an unheated garage?
A: An unheated garage works in mild climates where winter temperatures stay consistently above freezing. In colder regions, an unheated garage can drop well below 32°F, which will freeze and kill dahlia tubers. Check overnight lows throughout winter before relying on a garage. If temperatures dip dangerously low, move tubers to an insulated basement or add a layer of insulating material around the storage container to buffer against cold spikes.
Q: What is the best material for packing dahlia tubers?
A: Vermiculite is widely considered the most reliable dahlia tuber storage medium because it regulates moisture without becoming waterlogged. Peat moss works well too, though it can dry out faster. Cedar shavings are a sustainable, plastic-free alternative that also discourages fungal growth. Whichever medium you choose, the goal is the same: surround tubers with just enough material to prevent desiccation while allowing air circulation. Avoid sealing tubers in airtight bags without any medium.
Q: How do I know if my dahlia tubers have rotted in storage?
A: Check stored dahlia bulbs every three to four weeks. Rotting tubers feel soft or mushy when pressed, show dark or sunken spots, and may smell sour or fermented. Healthy tubers stay firm and hold their shape. If you find rot, cut away the affected area with a clean blade, dust the cut with cinnamon or sulfur powder, and return the tuber to fresh storage medium. Remove any fully rotted tubers immediately so the decay does not spread to healthy ones.
Q: What happens if you leave dahlia tubers in the ground over winter?
A: In USDA Hardiness Zones 8 to 10, dahlias can often overwinter in the ground with a thick layer of mulch for insulation. In Zones 7 and colder, leaving tubers in the ground almost always results in them freezing and dying. Even in borderline zones, a wet winter can cause tuber rot. Digging and storing dahlia tubers indoors is the safest approach for most gardeners and guarantees healthy plants return the following season.
Shop Best Sellers


