Growing Garlic Successfully: A Complete Guide
Table of Contents
- Hardneck vs Softneck Garlic: Choosing the Right Variety
- When to Plant Garlic: Regional Timing Calendars
- Soil Preparation for Growing Garlic Successfully
- Planting Depth, Spacing, and Mulching
- Watering, Fertilizing, and Pest Management
- How to Harvest and Cure Garlic the Right Way
- Seed Saving: Growing Garlic Successfully Year After Year
- Conclusion
Last Updated: August 30, 2026
Growing garlic successfully is one of the most rewarding things a home gardener can do, and at Firefly Farm and Mercantile, we've helped hundreds of gardeners get it right from the very first clove. Garlic rewards patience and punishes shortcuts. Plant the wrong variety for your climate, skip soil prep, or harvest too early, and you'll end up with small, disappointing bulbs. Get those three things right, and you'll pull gorgeous, full-sized heads from the ground every summer. Below, we'll walk you through every stage of the process, including regional timing calendars, container growing, troubleshooting yellowing foliage, and how to save your best cloves for next season's planting.
The thing most beginner guides miss is this: garlic is planted in fall, not spring. That single fact changes everything about how you plan, what you buy, and when you act.
Hardneck vs Softneck Garlic: Choosing the Right Variety
Choosing between hardneck and softneck garlic determines whether your crop thrives or merely survives.
Hardneck garlic produces a central flowering stalk called a scape, forms fewer but larger cloves per bulb, and requires a chilling period (vernalization) to develop properly. Softneck garlic produces no scape, stores longer, and tolerates milder winters without the same chilling requirement. We do have an exception that and is our Lorz Softneck that has been grown in our region for decades. This has allowed it to adapt and produce large and beautiful harvests.
Hardneck Varieties for Cold Climates
Hardneck varieties are the clear choice for gardeners in cold climates. They need sustained cold temperatures to trigger dormancy and build strong bulbs. Three hardneck varieties we carry at Firefly Farm and Mercantile stand out for cold-climate performance:
- Always the perennial favorite - Chesnok Red (Purple Stripe family) originates from Georgia and is widely regarded as one of the finest cooking garlics in the world, holding its flavor beautifully when roasted. Our Organic Chesnok Red is an heirloom variety with vivid purple striping.
- German White is our most cold hardy of all garlic. You should still mulch it for protection against seasonal temperature swings.
- Music Garlic (Porcelain family) produces large, easy-to-peel bulbs with bold, complex flavor. Our Organic Music Garlic is certified organic and available by the pound.
- German Red (Rocambole family) delivers full-bodied flavor with large, easy-to-peel cloves and striking purple-streaked skins. Our Organic German Red is a personal favorite for its bold heat and complexity.
Rocambole varieties like German Red have a shorter storage window (roughly 4-5 months), while Porcelain types like Music can store for 6-8 months under the right conditions.


Softneck Varieties for Mild Winters
Softneck garlic is the dominant type in commercial production because it stores well and ships reliably. For home gardeners in USDA zones 7 and warmer, softneck varieties are practical. They don't need deep cold to perform, and their braided bulbs are the classic image of garlic hanging in a farmhouse kitchen.
Variety Type | Best For | Cloves per Bulb | Storage Life | Scape |
|---|---|---|---|---|
Hardneck (Porcelain) | Cold climates, flavor | 4-6 large | 6-8 months | Yes |
Hardneck (Rocambole) | Cold climates, cooking | 8-12 medium | 4-5 months | Yes |
Hardneck (Purple Stripe) | All climates, roasting | 8-12 medium | 6-8 months | Yes |
Softneck (Artichoke) | Mild winters, storage | 12-20 small | 9-12 months | No |
When to Plant Garlic: Regional Timing Calendars
Plant in fall, 4-6 weeks before the ground freezes hard. Garlic needs enough time to establish a root system before winter, but you don't want green shoots to grow too tall before the cold sets in.
Here's how that timing translates by region:
- USDA Zones 3-4 (Upper Midwest, northern Minnesota): Plant mid-September to early October.
- USDA Zones 5-6 (Wisconsin, Michigan, New England): Plant mid-October to early November. This is the sweet spot for most hardneck varieties.
- USDA Zones 7-8 (Mid-Atlantic, Pacific Northwest): Plant November through early December. Softneck varieties perform well here.
- USDA Zones 9-10 (California, Gulf Coast): Plant December through January. Chill seed garlic in the refrigerator for 4-6 weeks before planting to compensate for the lack of natural vernalization.
According to USDA Plant Hardiness Zone Map, zone boundaries shifted in the 2023 update, so confirm your current zone before planning your planting calendar.
Soil Preparation for Growing Garlic Successfully
Most failed garlic crops trace back to poor soil, not poor technique. Garlic is unforgiving about drainage. A waterlogged bed in winter will rot cloves before they ever sprout.
pH Level, Drainage, and Organic Matter
Garlic thrives in loamy, well-drained soil with a pH level between 6.0 and 7.0. A simple soil test from your local cooperative extension service will tell you exactly where you stand.
To build the ideal growing environment:
- Test your soil pH and adjust with lime (to raise) or sulfur (to lower) at least two weeks before planting.
- Work in 2-3 inches of finished compost to improve drainage and organic matter content.
- Add a balanced organic fertilizer with phosphorus and potassium to support root development.
- Avoid high-nitrogen amendments at planting time, as nitrogen drives leafy growth rather than root establishment.
According to University of Wisconsin Extension soil management guides, garlic performs best when organic matter content is above 3%, achievable with consistent annual compost additions.
Raised Beds and Container Gardening for Garlic
Raised beds are a solution for gardeners dealing with heavy clay or poor drainage. A raised bed filled with topsoil, compost, and perlite gives you control over the growing environment. Garlic roots reach 12-18 inches deep, so a bed depth of at least 12 inches is ideal.
Container gardening for garlic works well with proper setup:
- Use containers at least 12 inches deep and 12 inches wide per plant cluster.
- Choose a mix of potting soil and compost, avoiding dense or water-retaining mixes.
- Plant 3-4 cloves per 12-inch container, spacing them 4-6 inches apart.
- In cold climates, move containers to an unheated garage or shed when temperatures drop below 0°F to prevent the root ball from freezing solid.
- Monitor moisture closely in spring, as container-grown garlic dries out faster than in-ground crops.
Planting Depth, Spacing, and Mulching
Plant each clove with the pointed end up, 2-4 inches deep from the tip of the clove to the soil surface. In very cold climates (zones 3-4), plant 3-4 inches deep for extra insulation against hard freezes.
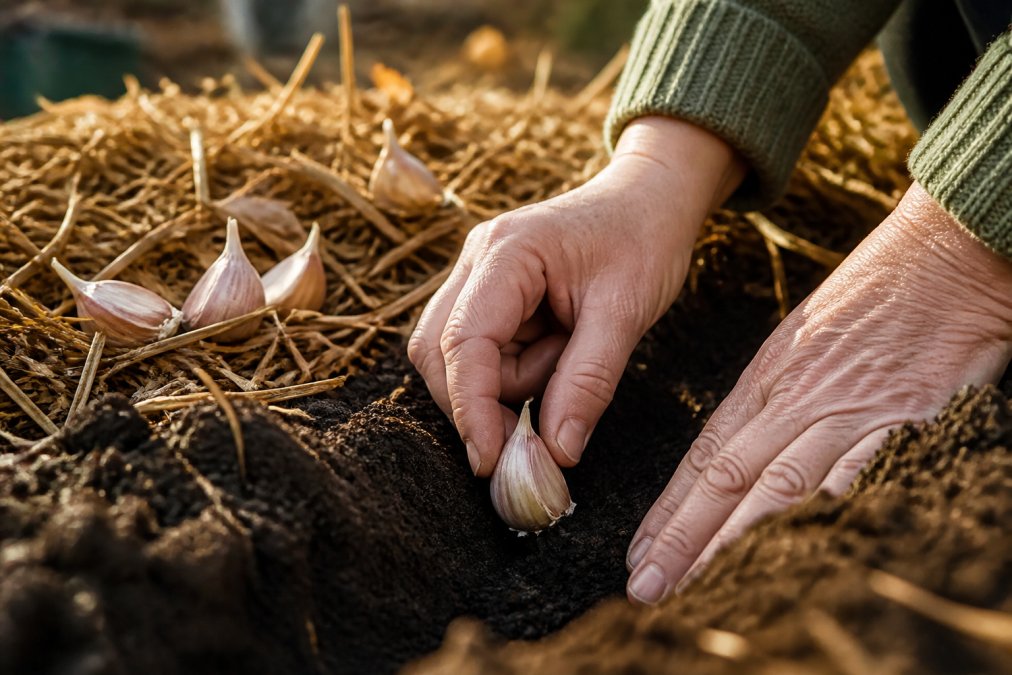
Close-up of a gardener's hands pressing a single garlic clove, pointed end up, into dark, richly composted garden bed soil, with loose straw mulch visible in the background and warm autumn light
Spacing matters more than most guides suggest. Tight spacing produces smaller bulbs. Use these guidelines:
- Clove to clove within a row: 6 inches
- Row to row spacing: 12 inches
- For raised beds: a 6x6 inch grid pattern works well
After planting, apply 4-6 inches of straw mulch over the entire bed. Mulch insulates the soil against temperature swings, suppresses weeds in spring, and retains moisture during dry spells. Straw is the preferred material because it allows air circulation while providing thermal protection.
Pull back the mulch slightly in early spring once daytime temperatures consistently exceed 40°F to let the soil warm faster.
Watering, Fertilizing, and Pest Management
Growing garlic successfully through the spring growth phase requires consistent moisture and timely feeding. Water deeply once per week during active spring growth, providing roughly 1 inch of water per week. Reduce watering in June as foliage begins to yellow and die back naturally. Stop watering entirely 2-3 weeks before your expected harvest date to allow the outer bulb wrappers to dry and cure while still in the ground. starting seeds indoors.
For fertilizing:
- Early spring (when shoots emerge): Side-dress with a nitrogen-rich amendment like blood meal to support rapid foliage growth.
- Mid-spring (when plants are 6-8 inches tall): Apply a phosphorus and potassium amendment to support bulb development.
- Late spring (after scape removal): Stop all fertilizing. The plant is now putting all its energy into bulb sizing.
Pest pressure on garlic is generally low. Purchase only certified nematode-free seed garlic from reputable sources. Allium leaf miner, a relatively new invasive pest in the eastern US, can be managed with row cover during its spring flight period.
Troubleshooting Yellowing Leaves
Yellowing leaves on garlic plants are the most common concern home gardeners raise, and the answer depends entirely on timing.
Yellow leaves in late May or June are completely normal. As the plant shifts energy from foliage to bulb development, the lower leaves yellow and die back progressively from the bottom up. This is the harvest signal, not a problem.
Yellow leaves in March or April are a warning sign. Possible causes include:
- Nitrogen deficiency: Pale yellow color across all leaves, starting at the tips. Fix with a side-dressing of blood meal or fish emulsion.
- Overwatering or poor drainage: Yellow leaves with soft, mushy bases. Improve drainage immediately and reduce watering frequency.
- Botrytis (gray mold): Yellow leaves with visible gray fuzzy growth. Remove affected plants and improve air circulation.
- Rust: Orange or yellow pustules on leaf surfaces. Remove affected foliage and avoid overhead watering.
According to Cornell University's vegetable disease identification resources, early identification of fungal diseases in allium crops significantly improves management outcomes.
How to Harvest and Cure Garlic the Right Way
Harvest timing is where many gardeners make their biggest mistake. Pull too early, and the cloves are underdeveloped with thin wrappers that won't store. Pull too late, and the bulb has begun to split, reducing shelf life dramatically.
The harvest window is determined by the foliage: when half the leaves have yellowed and died back, and half remain green, the bulbs are ready. For most hardneck varieties in zones 5-6, that's late June to mid-July.
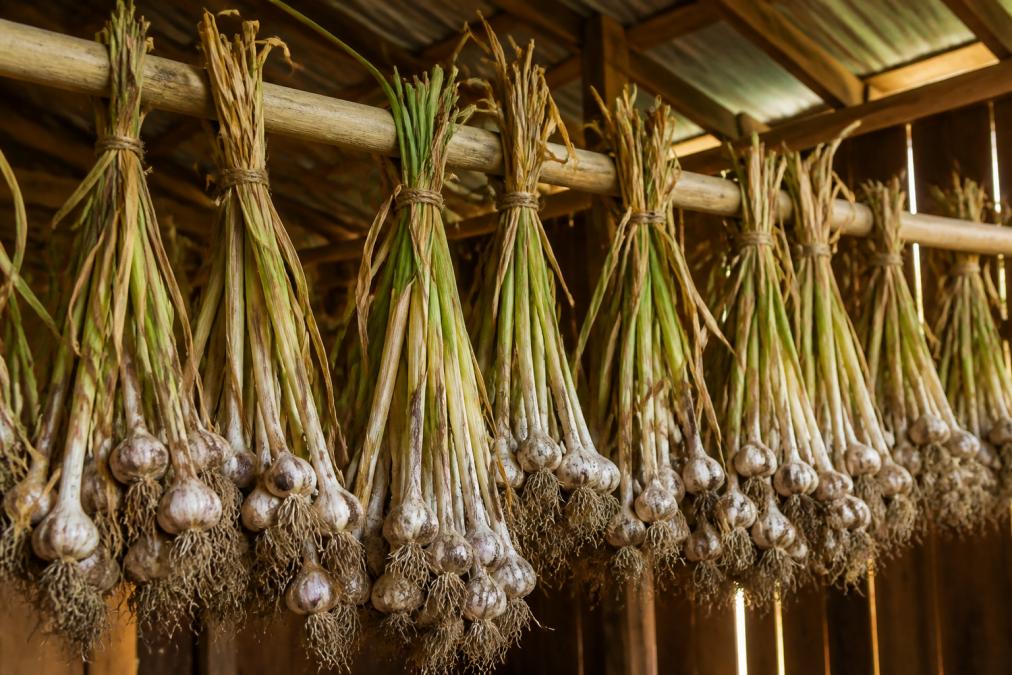
Freshly harvested garlic bulbs with foliage still attached, bundled in groups of 10-12 and hanging from a horizontal wooden dowel in a well-ventilated wooden barn, warm afternoon light filtering through gaps in the siding
To harvest cleanly:
- Loosen the soil around each plant with a fork or trowel before pulling. Don't yank by the stalk.
- Lift the bulb gently, keeping the foliage and roots intact.
- Brush off loose soil. Do not wash the bulbs.
- Bundle 8-12 plants together and hang them on a curing rack or horizontal pole in a shaded, well-ventilated location.
Curing takes 3-6 weeks. During this time, the outer wrappers dry and tighten around the cloves, the neck dries completely, and the flavor develops and concentrates. Good air circulation is non-negotiable during curing. After curing, trim the roots to about half an inch and cut the stalks to 1-2 inches above the bulb. Store cured bulbs in mesh bags or open crates at 55-65°F with low humidity. Avoid plastic bags or sealed containers, which trap moisture and invite mold.
Seed Saving: Growing Garlic Successfully Year After Year
Garlic doesn't produce true seeds the way tomatoes or beans do. Propagation happens through the cloves themselves, which means every bulb you save for replanting is a genetic clone of its parent. Once you find a variety that performs brilliantly in your specific conditions, you can propagate it indefinitely.
Seed saving for garlic is the practice of selecting your largest, healthiest bulbs at harvest and setting them aside for fall planting rather than eating them.
Here's a simple selection protocol:
- At harvest, set aside the top 20% of bulbs by size and appearance.
- Look for bulbs with tight, intact wrappers and no signs of disease.
- Store these seed bulbs separately, in a cool, dry location with good air circulation.
- At planting time, choose the largest cloves from each saved bulb. Larger cloves produce larger plants and ultimately larger bulbs.
Over several seasons of consistent selection, you'll develop a locally adapted strain that outperforms commercially purchased seed garlic in your specific microclimate. This is how heirloom varieties like our Naturally Grown German White Garlic have survived and improved over generations. German Extra Hardy White, a Porcelain hardneck, is legendary for withstanding brutal winter temperatures.
Hardneck varieties also produce bulbils: tiny clove-like structures that form on the scape. You can plant bulbils in fall and grow them out over 2-3 seasons to produce full-sized bulbs, allowing you to multiply your stock rapidly from a small initial quantity. Rotate your garlic bed to a new location every 3-4 years and inspect saved seed cloves carefully for soft spots, discoloration, or unusual odor before planting.
As documented in National Sustainable Agriculture Information Service resources on seed saving, selecting for local adaptation over multiple generations is one of the most effective strategies for improving crop performance without chemical inputs.
Growing garlic is one of those skills that compounds over time. Each season teaches you something the last one didn't. If you're ready to start with seed garlic that has genuine heirloom provenance and cold-climate performance behind it, Firefly Farm and Mercantile carries certified organic varieties including Music, Chesnok Red, German Red, and German White, all selected for flavor and winter hardiness. Andre and the team are happy to help you match the right variety to your zone and your kitchen. Shop our garlic seed collection and put something genuinely worth growing in the ground this fall.
Frequently Asked Questions
Q: What is the most common mistake when planting garlic?
A: Planting cloves too shallow or too late in the season are two mistakes that trip up many first-time growers. Cloves need to be set about 2 inches deep so the root system establishes before the ground freezes. Planting after the soil has already hardened means the clove may not get the cold vernalization period it needs to form a full, multi-cloved bulb come summer. Always plant in fall, several weeks before your first hard freeze.
Q: Can I leave garlic in the ground over winter?
A: Yes — for hardneck varieties, overwintering in the ground is exactly what they need. Garlic requires a chilling requirement, called vernalization, to trigger proper bulb development. The clove goes into dormancy through winter and breaks dormancy in early spring. A layer of straw mulch 4 to 6 inches deep protects the root system in zones with brutal cold. Softneck types are less winter hardy and may rot in wet, heavy soils if left unprotected.
Q: How do I know when my garlic is ready to harvest?
A: Count the green leaves, or foliage, still standing on the plant. Each green leaf corresponds to a wrapper layer on the bulb. When roughly half the leaves have browned — typically 5 to 6 green leaves remain — the bulb is at its harvest window. Waiting too long causes the wrappers to break down, making the bulb harder to cure and store. Dig a test bulb first rather than pulling the whole crop at once.
Q: What month should garlic be planted?
A: Most growers in northern states plant garlic in October, while gardeners in milder southern regions can plant through November or even early December. The target is to get cloves in the ground 4 to 6 weeks before the soil freezes solid. This gives roots time to establish without sending up significant top growth that could be damaged by hard frost. Check your local average first-freeze date and count back from there to find your ideal planting window.


